Week 1: The Gesture
Student examples:

Drawing the figure begins with the gesture. A gesture drawing is a very quick sketch, sometimes only a few lines, and is usually completed in one to five minutes. The purpose of gesture is to capture the essence of a figure. An effective gesture drawing gracefully captures a model’s height, movement, and general pose using a minimal number of marks. Longer gestures may include major anatomical landmarks such as the torso, pelvis, head, feet, knees, and hands. They are more of a “skeletal analogy” than a detailed rendering of the body’s surface.
The video below by Professor Chris Warner demonstrates a number of techniques in order to draw an effective gesture.
While You Watch:
Pay special attention to the following:
- How he holds the pencil.
- How lightly he draws at the beginning.
- How he builds up darkness by lightly going over the same lines several times, not by pressing down hard with the pencil.
- Each pass with the pencil is a searching line.
- How he uses long fluid strokes instead of short broken ones.
- The order in which he draws each part of the body.
- That he does not erase any of his process marks or errors. He uses them to make corrections.
- How he sights each angle.
Tips For Watching:
- I suggest you watch this video with captions on.
- Watch it once all the way through to get a feel for the content.
- Then watch it a second time, pause and play often so you can work along side if applicable.
There is little individuality in Professor Warner’s drawings at this point. His focus is more on summarizing the structure of the figure than rendering facial details or the outside contour. Gestures generalize anatomy, capturing pose and attitude more than specific individual features.
Also notice how light Professor Warner’s drawings are, especially as he begins. As you become more confident that your marks are correct, darken them. If you watch the video again, you will see that Professor Warner often passes over the same line several times in quick succession as he confirms its accuracy. By this action, the correct line becomes darker. You should continually measure and angle sight.
Try not to erase immediately when you make an error. Instead, use your mistakes to (feel your way) to guide you to the correct marks. Only then might you choose to erase unwanted lines. However, if you made your process lines light enough, there should be no need to erase them at all.
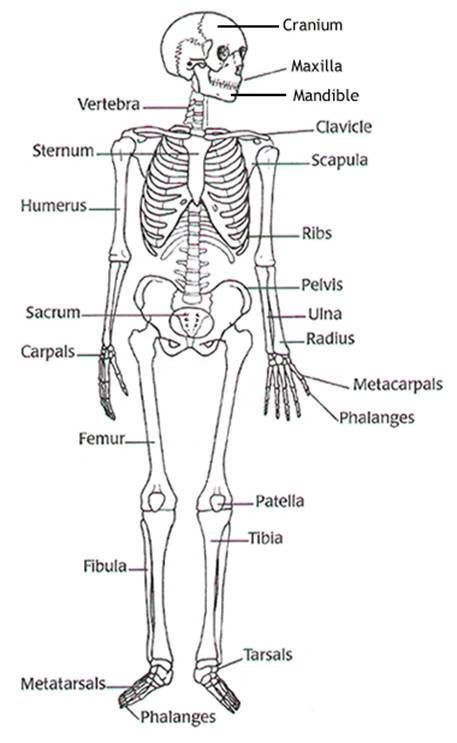
Human Anatomy References:
In the video, Professor Warner refers to structures part of the human skeleton. Please see diagrams below for reference.